How It Works
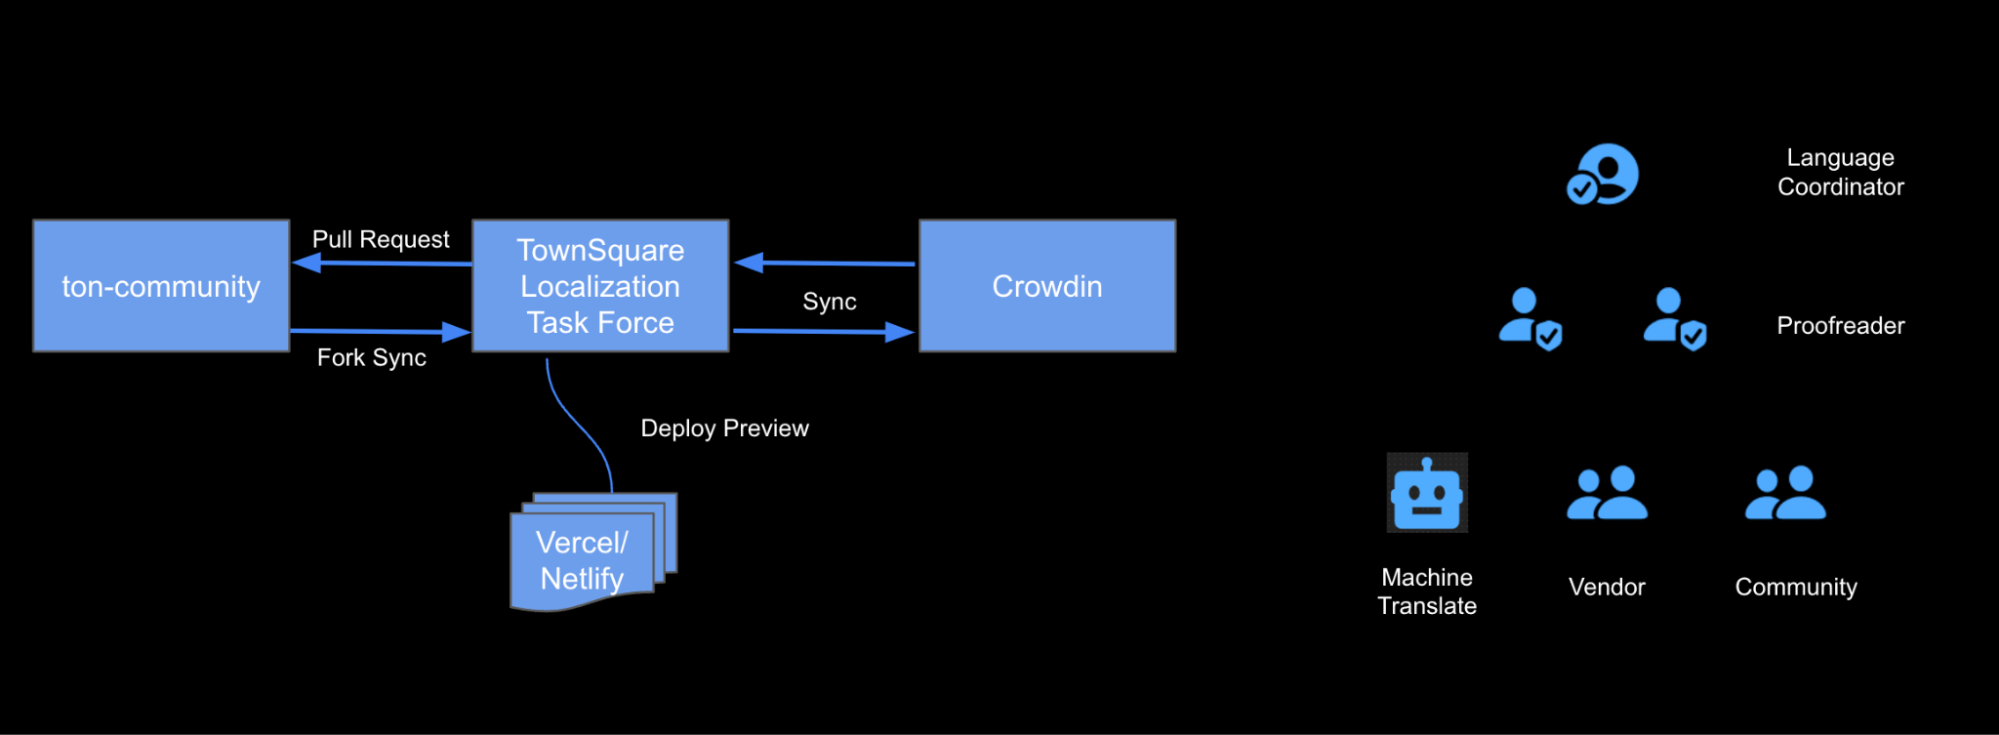
The TownSquare Labs Localization Program comprises several key components. This chapter will provide an overview of how the program operates, helping you understand its workings and how to use it effectively.
Within this system, we integrate several applications to function seamlessly as a unified program:
- GitHub: Hosts the documentation, synchronizes docs from the upstream repository, and syncs translations to specific branches.
- Crowdin: Manages translation processes, including translating, proofreading, and setting language preferences.
- AI Systems: Utilizes advanced AI to assist translators, ensuring smooth workflow.
- Customized Glossary: Guides translators and ensures AI generates accurate translations based on the project’s context. Users can also upload their glossaries as needed.
This guide won't cover the entire process in detail, but it will highlight the key components that make the TownSquare Labs Localization Program unique. You can explore the program further on your own.
GitHub Synchronization for Documentation and Translations
Our repository utilizes several branches for managing documentation and translations. Below is a detailed explanation of the purpose and function of each special branch:
Branches Overview
1. dev
The dev branch runs GitHub Actions to handle synchronization tasks. You can find the workflow configurations in the .github/workflows directory:
sync-fork.yml: This workflow synchronizes documentation from the upstream repository. It runs daily at 00:00.sync-translations.yml: This workflow synchronizes updated translations to the respective language branches for preview purposes on the corresponding language websites.
2. localization
This branch stays in sync with the upstream repository through GitHub Actions running on the dev branch. It is also used for updating certain codes that we intend to propose to the original repository.
3. l10n_localization
This branch includes all changes from the localization branch and translations from Crowdin. All modifications in this branch are committed to the upstream repository.
4. [lang]_localization
These branches are designated for specific language previews, such as ko_localization for Korean and ja_localization for Japanese. They allow us to preview the website in different languages.
By maintaining these branches and using GitHub Actions, we efficiently manage the synchronization of our documentation and translation updates, ensuring that our multilingual content is always up to date.
How to Set Up a New Crowdin Project
Log in to your Crowdin account.
Click
Create new projectin the menu.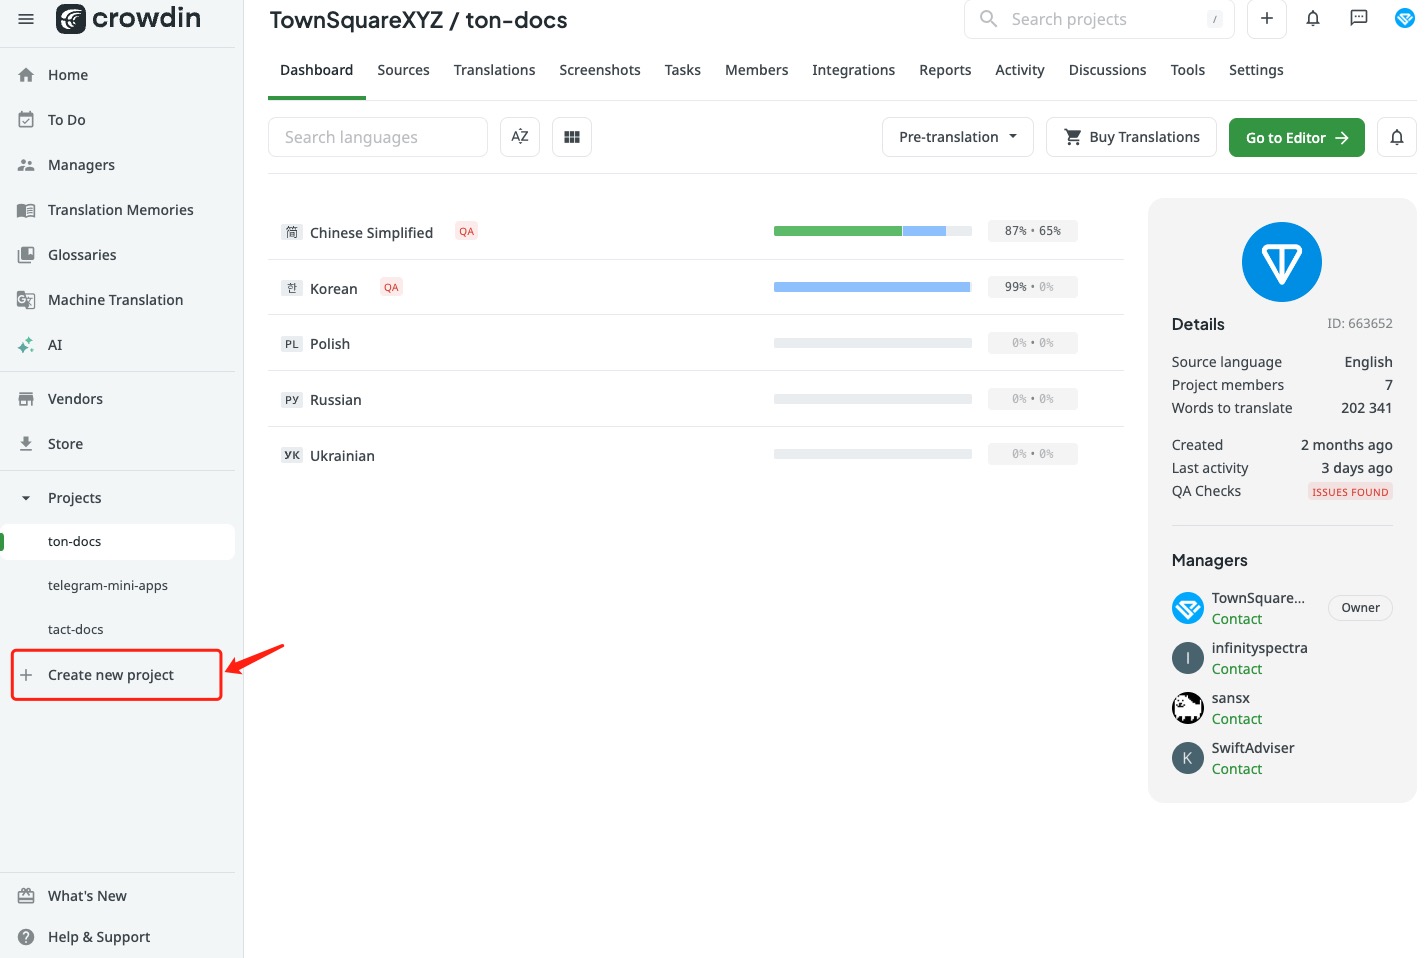
Set your Project name and Target languages. You can change the languages in the settings later.
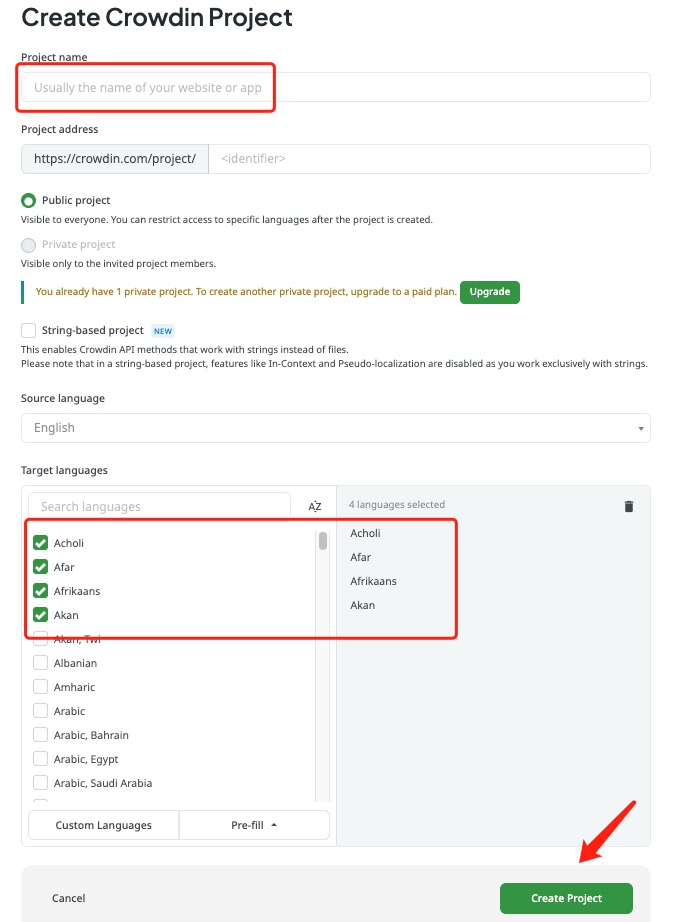
Go to the project you just created, select the Integrations tab, click the
Add Integrationbutton, search forGitHub, and install it.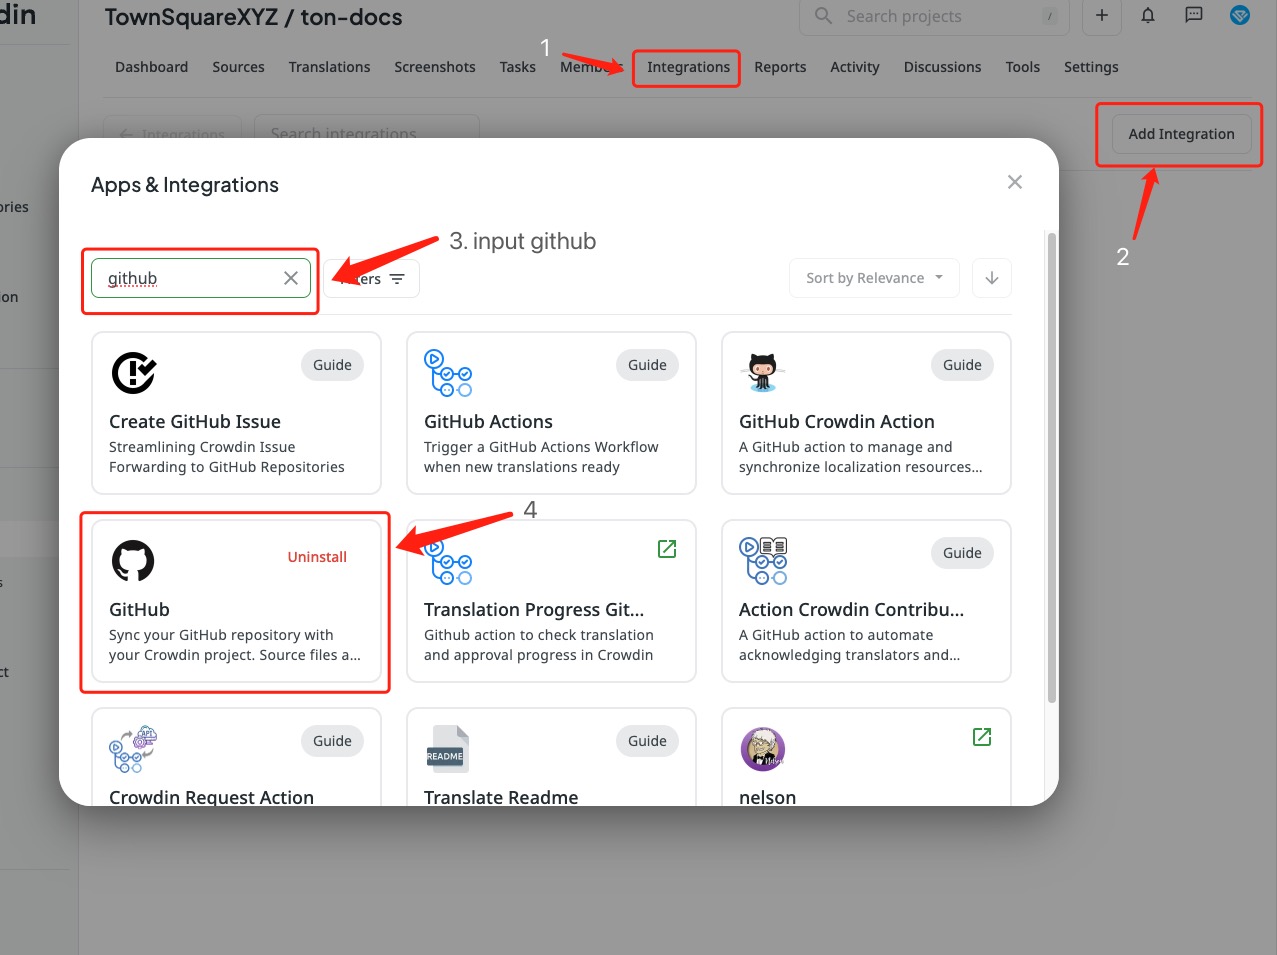
Before configuring GitHub integrations on Crowdin, specify which files to upload to Crowdin to avoid uploading unnecessary files:
Create a crowdin.yml file in the root of your GitHub repo with the basic configuration:
project_id: <Your project id>
preserve_hierarchy: 1
files:
  - source: <Path of your original files>
    translation: <Path of your translated files>
Get the correct configuration values:
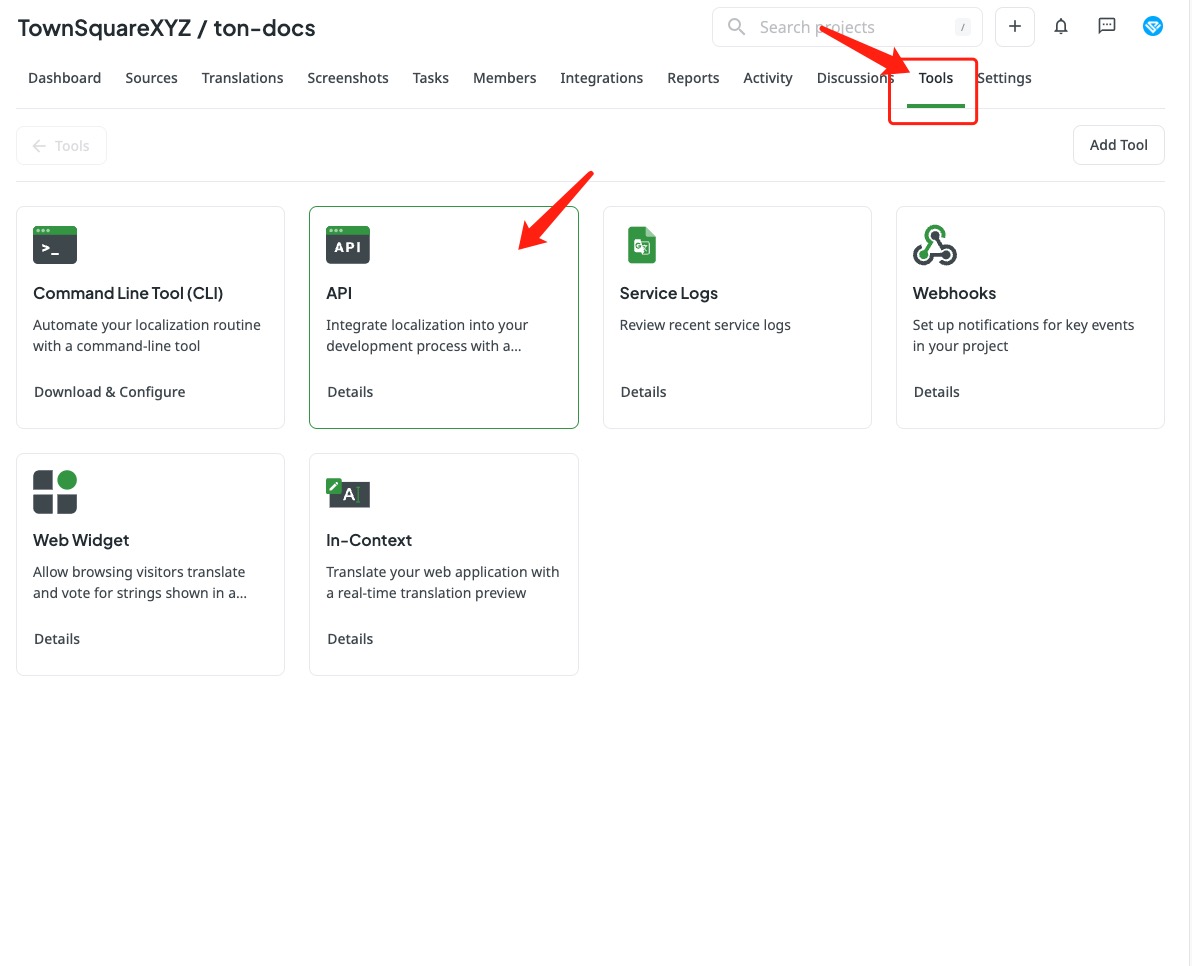
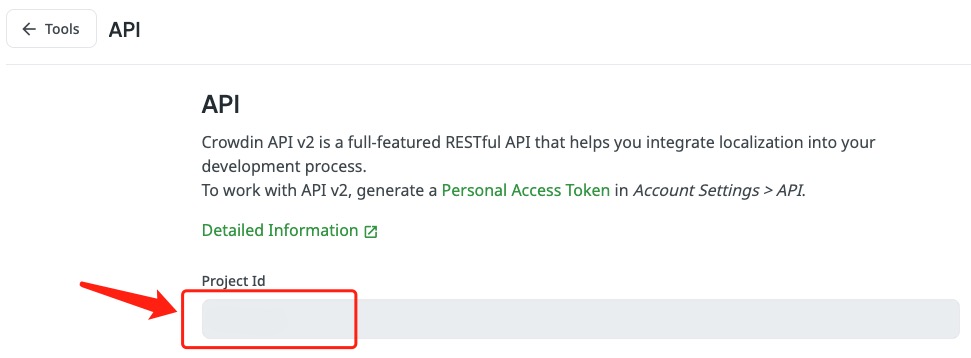
project_id: In your Crowdin project, go to the Tools tab, select API, and find the project_id there.
preserve_hierarchy: Maintains the GitHub directory structure on the Crowdin server.
source and translation: Specify the paths for the files to upload to Crowdin and where the translated files should be output.
Refer to our official config file for an example.
More details can be found in the Crowdin configuration documentation.
Configure Crowdin to connect to your GitHub repo:
- Click
Add Repositoryand selectSource and translation files mode.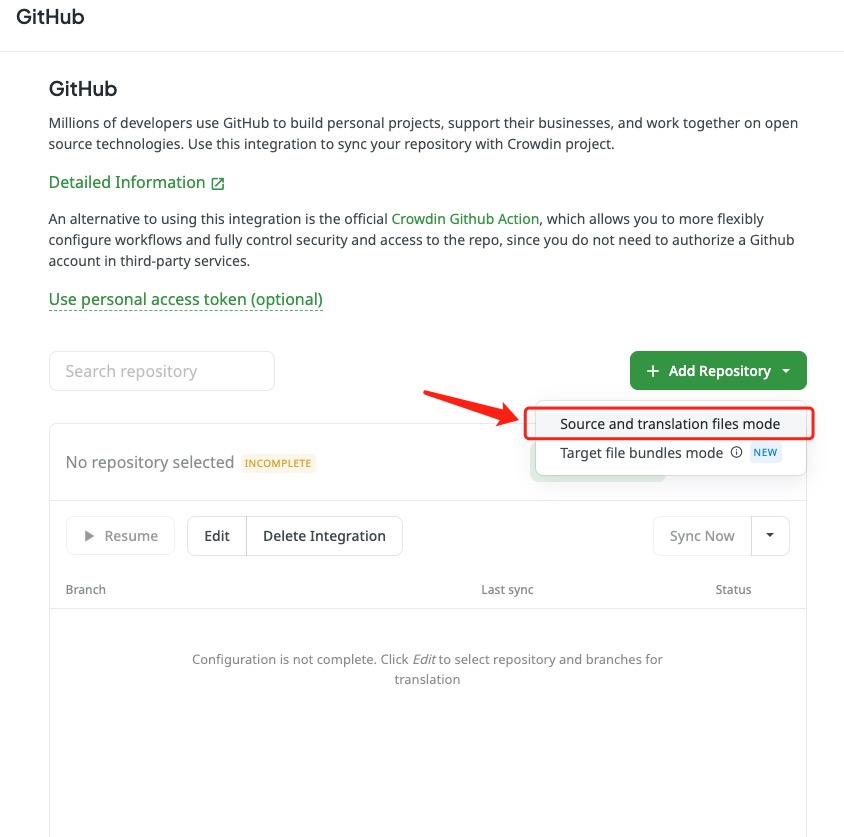
- Connect your GitHub account and search for the repo you want to translate.
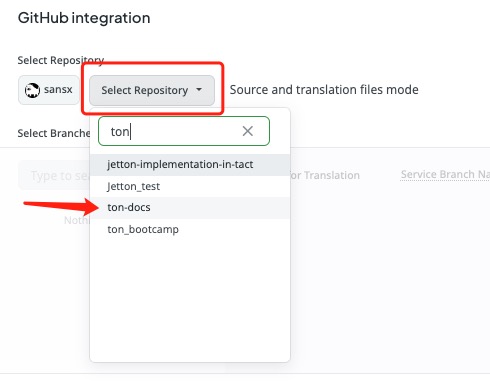
- Select the branch on the left, which will generate a new branch where Crowdin will post the translations.
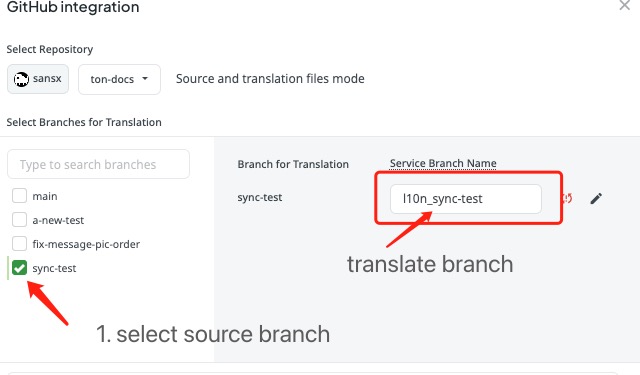
- Choose the frequency for updating translations to your GitHub branch. Default settings can be kept for other configurations, then click save to enable the integration.
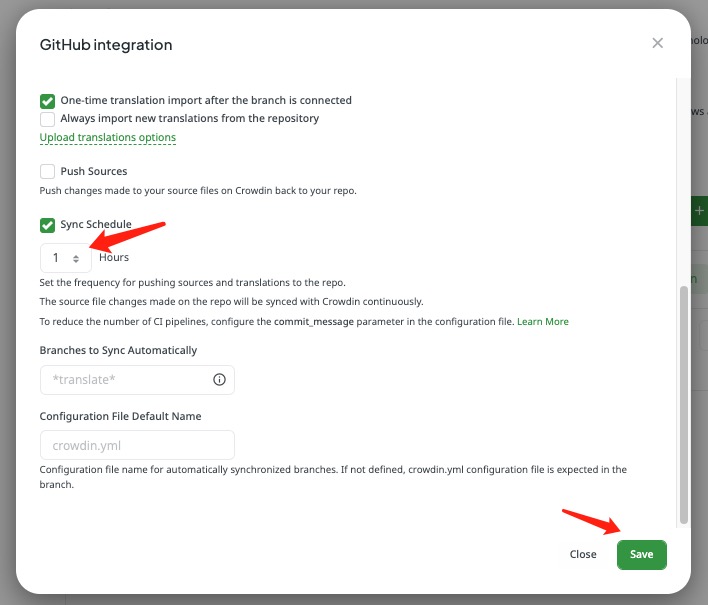
- Click
Refer to the GitHub integration documentation for more details.
- Finally, you can click the
Sync Nowbutton to sync the repo and translations whenever needed.
Glossary
What is a Glossary?
Sometimes, AI translators can't recognize specific terms that shouldn't be translated. For instance, we don't want "Rust" translated when referring to the programming language. To prevent such mistakes, we use a glossary to guide translations.
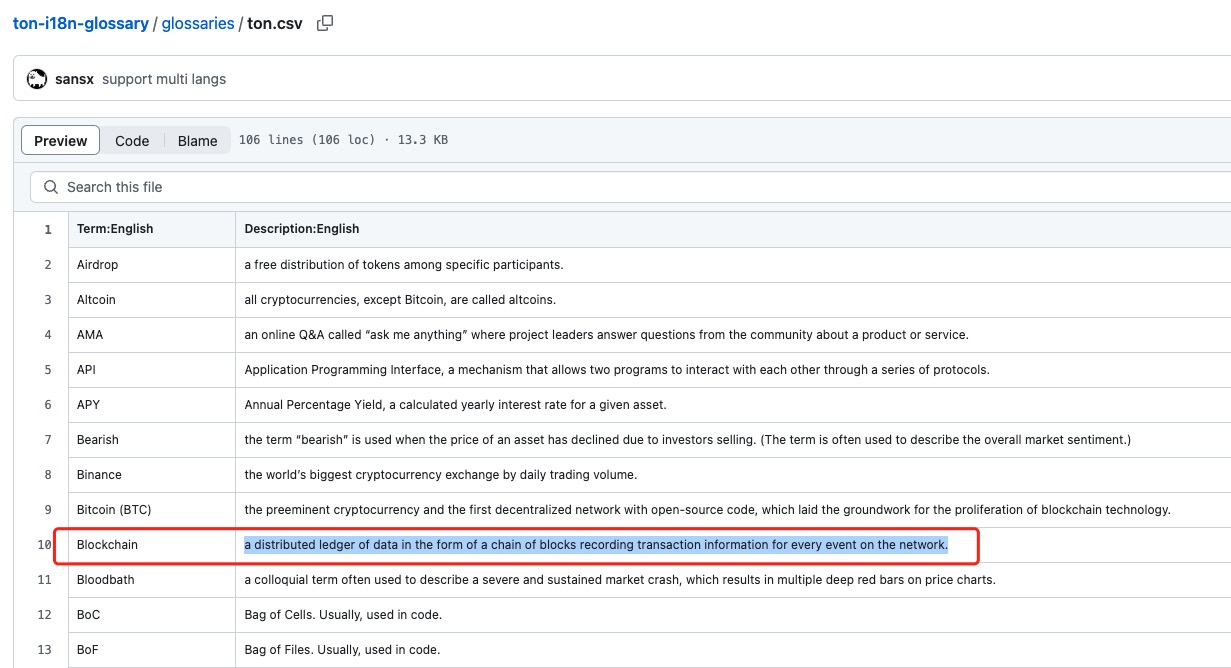
A glossary allows you to create, store, and manage project-specific terminology in one place, ensuring terms are translated correctly and consistently.
You can check our ton-i18n-glossary for reference.
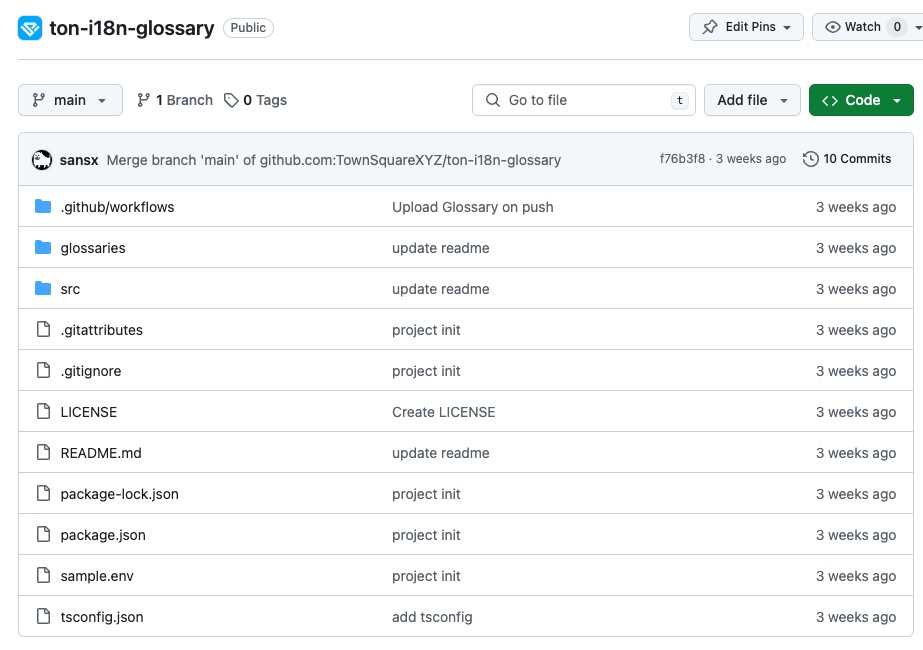
How to Set Up a Glossary for a New Language?
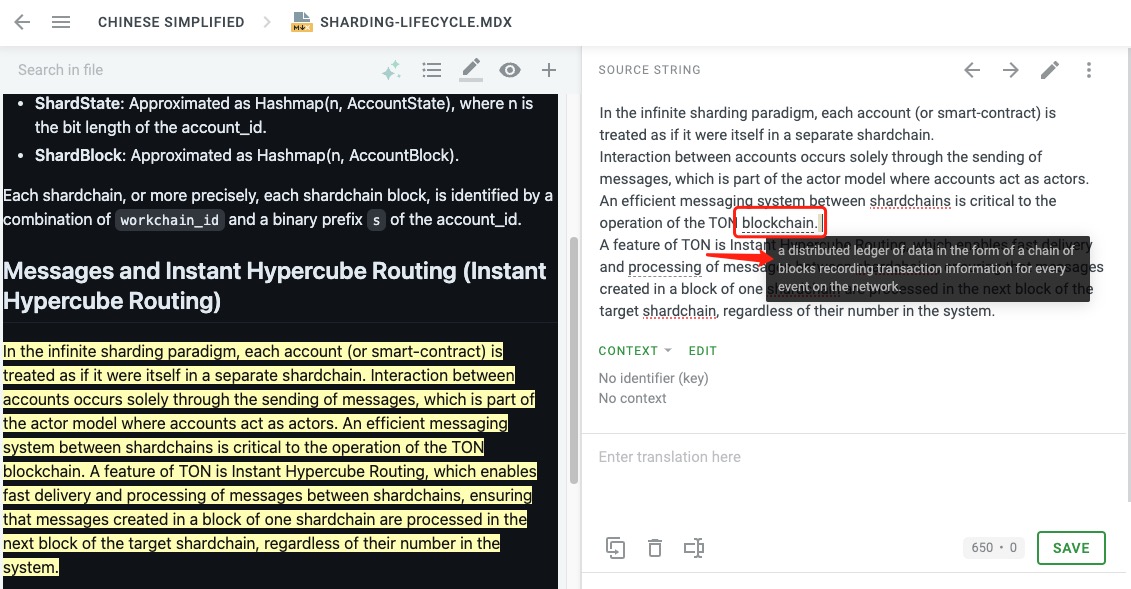
Most translation platforms support glossaries. In Crowdin, after setting up a glossary, each term appears as an underlined word in the Editor. Hover over the term to see its translation, part of speech, and definition (if provided).
In DeepL, simply upload your glossary, and it will be used automatically during AI translation.
We have created a program for glossary that auto-uploads updates.
To add a term to the glossary:
If the English term already exists in the glossary, find the corresponding line and column for the language you want to translate, input the translation, and upload it.
To upload a new glossary, clone the project and run:
npm inpm run generate -- <glossary name you want>
Repeat step 1 to add the new term.
Simple and efficient, isn’t it?
How to Take Advantage of AI Translation Copilot?
AI translation copilot helps break down language barriers with several advantages:
- Enhanced Consistency: AI translations are based on up-to-date information, providing the most accurate and current translations.
- Speed and Efficiency: AI translation is instantaneous, handling large volumes of content in real-time.
- Robust Scalability: AI systems continuously learn and improve, enhancing translation quality over time. With the provided glossary, AI translations can be tailored to the specific needs of different repositories.
To use AI translation in Crowdin (we use DeepL in our project):
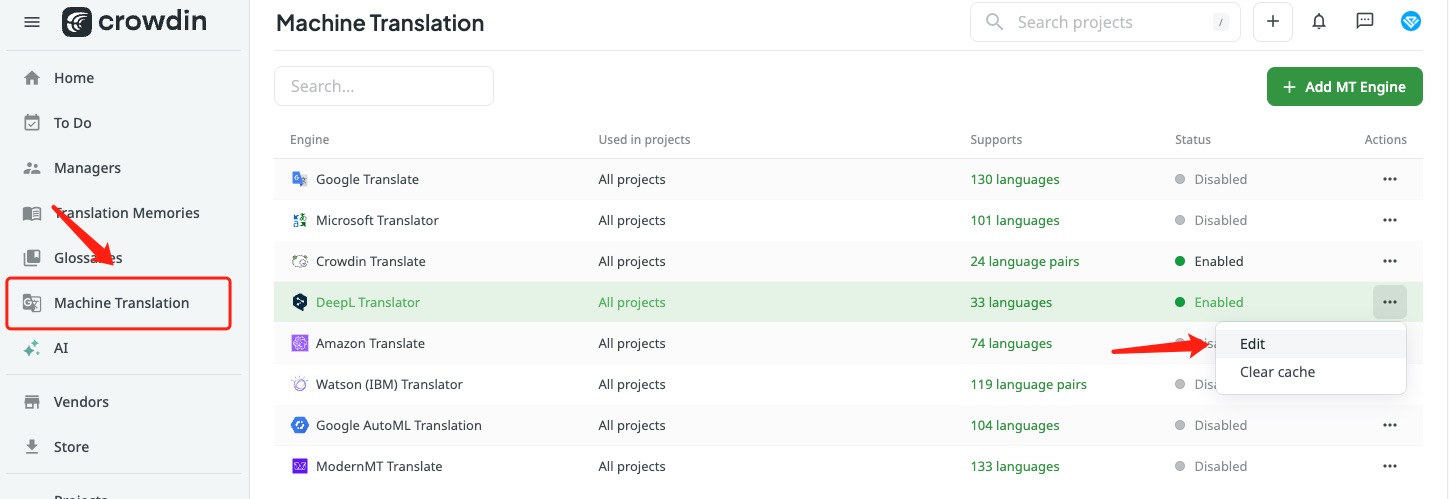
- Select Machine Translation in the Crowdin menu and click edit on the DeepL line.
- Enable DeepL support and input the DeepL Translator API key.
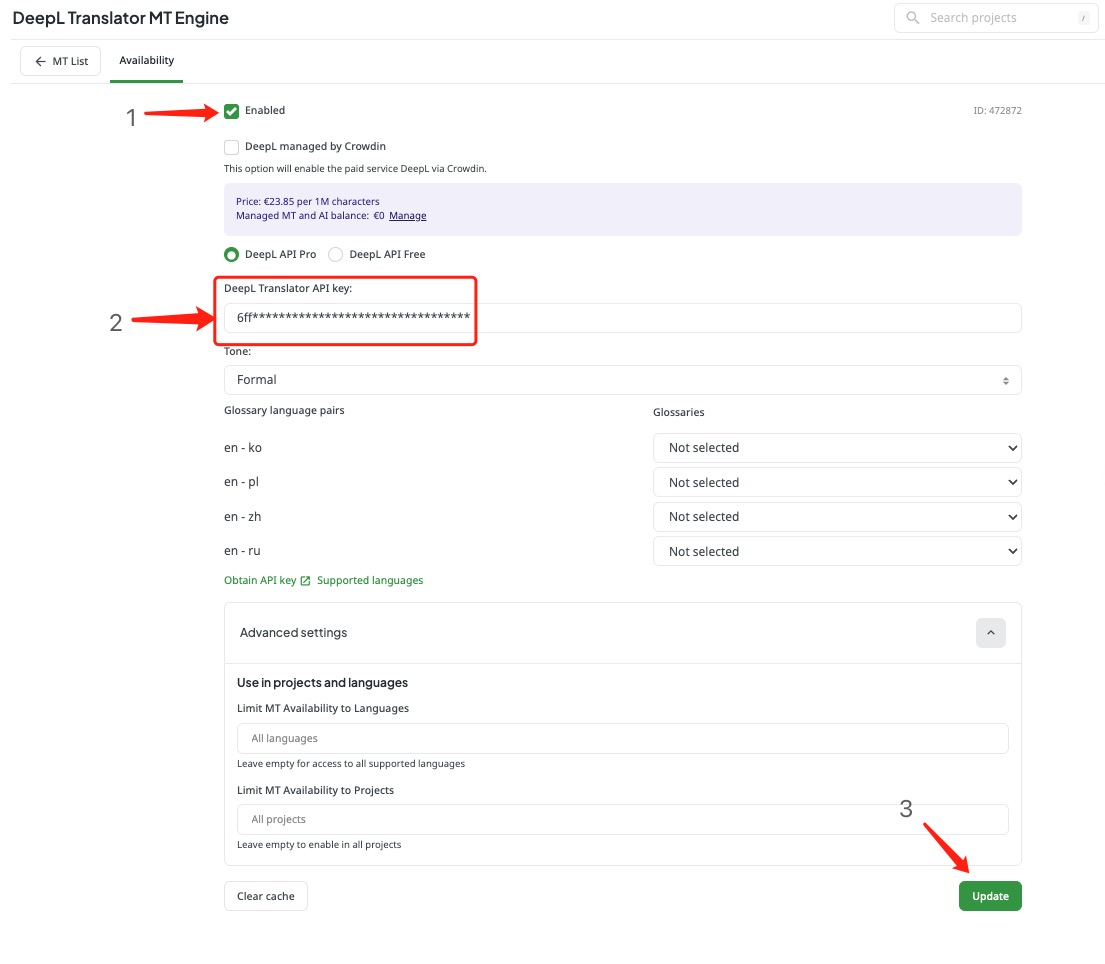
Our DeepL setup uses a customized glossary. Check ton-i18n-glossary for details on uploading the glossary.
In the repo, click Pre-translation and select via Machine Translation.
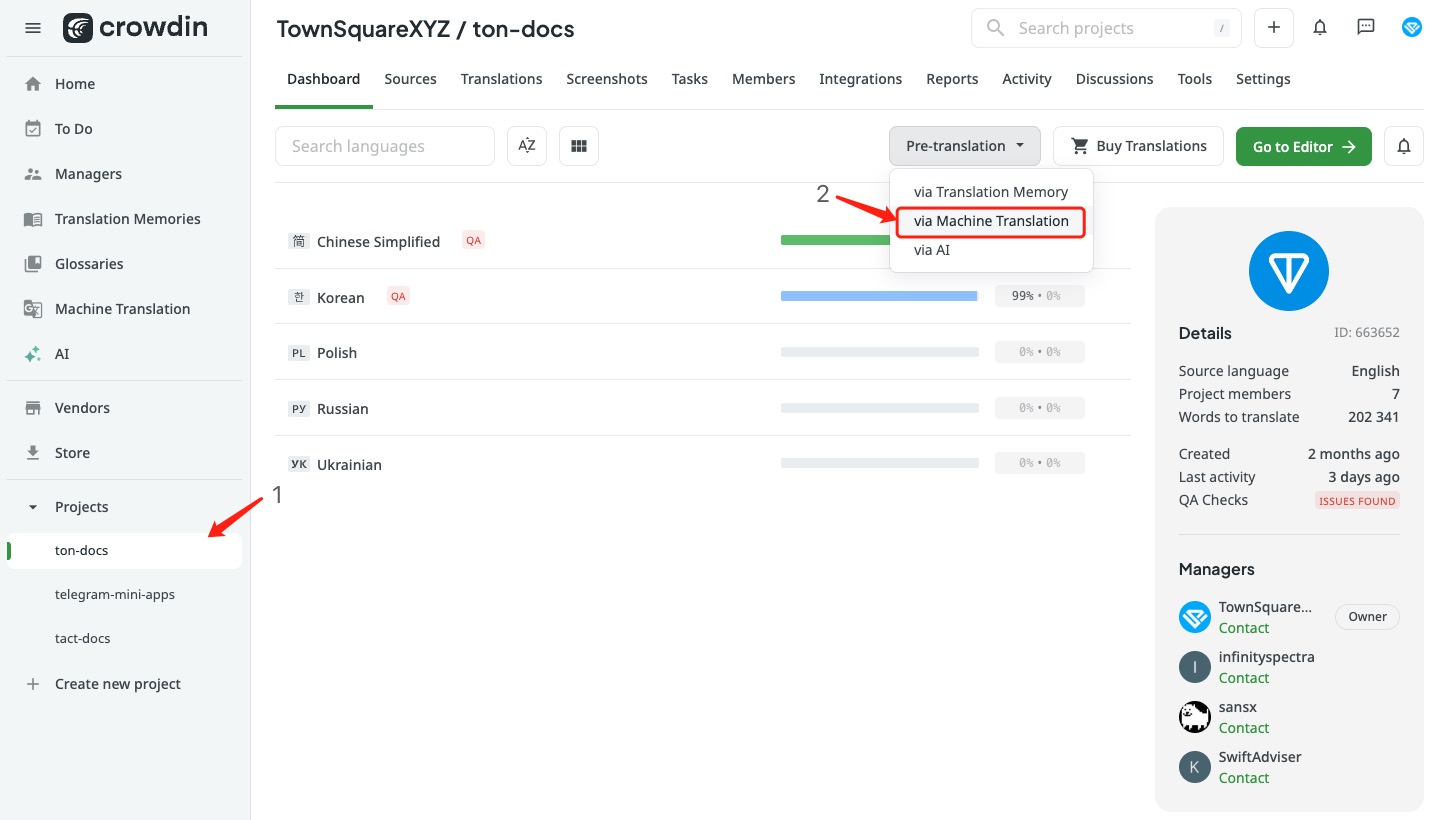
Choose DeepL as the Translation Engine, select the target languages, and select the files to translate.
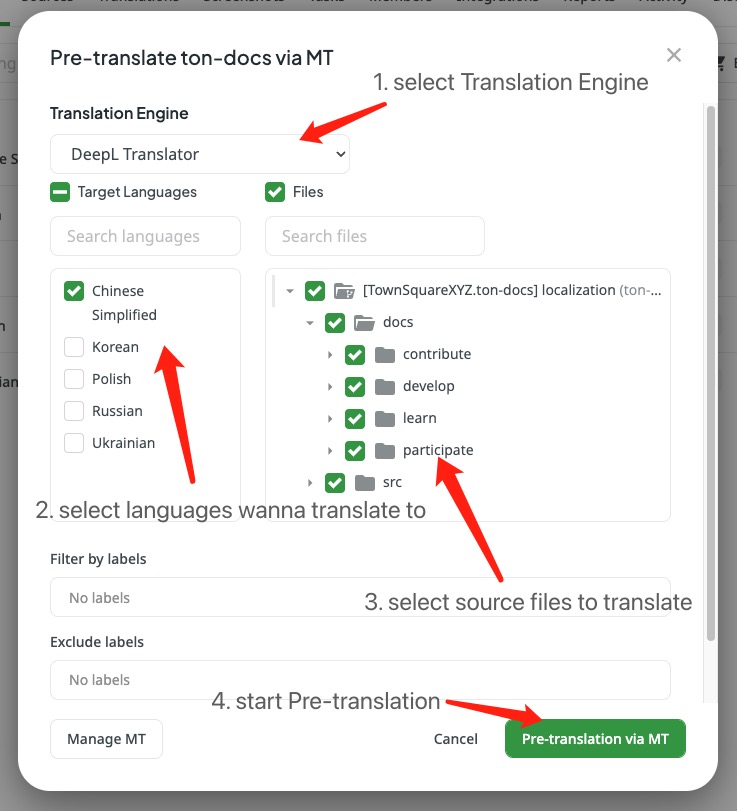
That's it! Now you can take a break and wait for the pre-translation to complete.